Why Your Production Logs Never Have What You Need
Why production logs never have what you need and how to fix it. Replace reactive logging with dynamic logs and tracing to cut debug time by 80%.

Logs often fail when you need them most. Why? They rely on developers guessing what might matter during debugging - guesses that often miss the mark. This leads to two common problems:
- Too much noise: Endless log lines make finding useful data a chore.
- Key details missing: Critical variables or context are often overlooked.
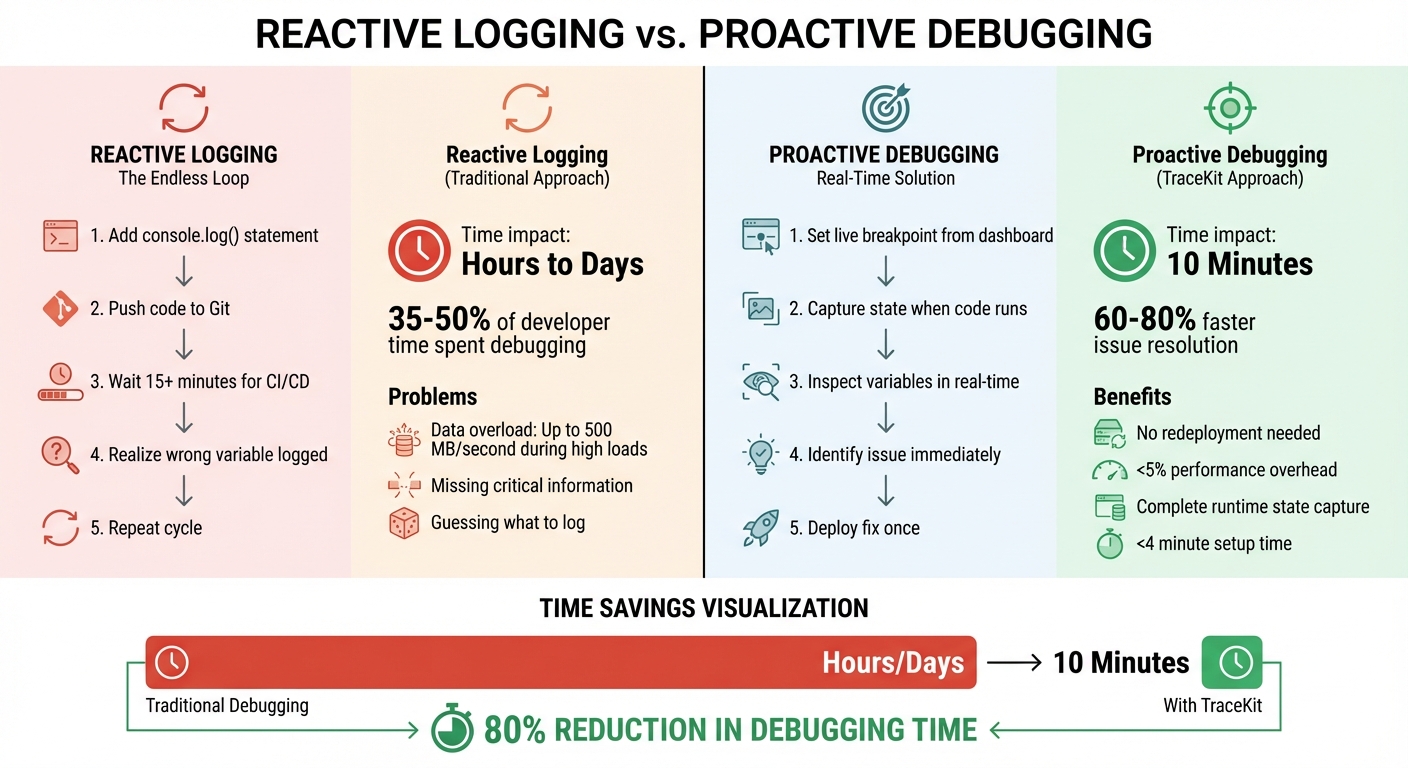
The result? Debugging takes hours or days as you repeatedly add logs, redeploy, and wait. Worse, 35–50% of developer time is spent debugging, slowing feature releases and disrupting workflows.
The solution? Tools like TraceKit replace reactive logging with real-time debugging. Features such as dynamic logs and distributed tracing allow you to inspect code and track requests without redeploying. This reduces debugging time by up to 80% and simplifies error resolution.
For small teams, TraceKit offers affordable pricing starting at $29/month, with faster setup and fewer costs compared to enterprise tools like Datadog or Sentry. This makes it an ideal choice for cutting debugging time and boosting productivity.
Debugging Production Issues: Junior Developer vs Senior Developer
Reactive Logging vs. Proactive Debugging
Reactive Logging vs Proactive Debugging: Time and Cost Comparison
Why Reactive Debugging Fails
The problem with reactive logging is that it assumes you can anticipate what you'll need to debug. Here's how it typically plays out: you add a console.log or logger.info() statement, push the code to Git, wait 15+ minutes for the CI/CD pipeline to finish, and then realize you logged the wrong variable. So, you repeat the process - again and again. This trial-and-error loop can stretch over hours or even days[1].
Modern development makes this even harder. Debugging complex codebases - whether written by an AI assistant or another team member - turns into a guessing game. You’re left trying to predict which variables or states will be important later, often without enough context.
"Logging isn't a feature. It's insurance. And like all insurance, you want to pay the minimum premium for maximum coverage." - CTO at Integrated Worlds[3]
This approach is inefficient for two main reasons. First, it can lead to data overload, where logs generate up to 500 MB of data per second during high loads[3]. Second, it risks missing critical information, leaving you without the clues needed to pinpoint the root cause of a failure.
Instead of wasting time in this cycle, proactive debugging provides a smarter, real-time alternative.
How Proactive Debugging Works
Proactive debugging eliminates the guesswork. Instead of repeatedly redeploying code, you capture the system's state at the exact moment an issue occurs. This approach saves time and avoids the delays caused by redeployment. Tools like TraceKit use dynamic logs - or "capture points" - to let you inspect variables in real time, without needing to redeploy the code[1].
Another key feature of proactive debugging is distributed tracing. It automatically follows a single request across all your services using standardized correlation IDs, such as those defined by the W3C Trace Context. This gives you a complete view of the request's lifecycle, from database queries to API calls. The best part? The performance impact is minimal, adding less than 5% overhead[1].
For teams with strong observability practices, this can lead to significant time savings - resolving production issues 60% to 80% faster[4]. For smaller teams juggling tight deadlines, this could mean fixing a bug in 10 minutes instead of getting stuck in the endless log-redeploy-wait loop for days.
How Dynamic Logs and Tracing Work
Dynamic Logs: Debug Without Redeploying
Dynamic logging, often called "capture points", allow you to inspect runtime states without modifying code or redeploying your application. From the TraceKit dashboard, you simply choose a file and line number, and the SDK captures details like variable values, payloads, and headers the next time that line of code runs.
Unlike traditional IDE breakpoints that halt your application, dynamic logs operate asynchronously. Your app keeps running smoothly while you collect the data you need. The impact on performance? Minimal - less than 5% overhead[1]. Plus, setup is quick and straightforward, taking less than 4 minutes with a single-command installation[1].
This approach is ideal to debug production issues faster, as it captures runtime states exactly when issues occur.
Here’s an example: In early 2026, Alex, a solo SaaS founder, was losing subscribers due to an intermittent Stripe webhook failure. Using the dashboard, he placed a capture point at the webhook handler. Within minutes, he identified a race condition where an asynchronous database write happened after a log statement, causing critical data to be missed. The bug was diagnosed in just 10 minutes and resolved with a single deployment[1].
TraceKit supports multiple languages, including PHP, Node.js, Go, Python, Java, and Ruby. It also offers automatic instrumentation for popular frameworks like Laravel, Express, Django, and Spring Boot[5]. And since it’s built on the OpenTelemetry standard, you’re not locked into a specific vendor.
This kind of real-time debugging naturally complements distributed tracing, which provides a broader view of your system’s performance.
Distributed Tracing: Track Requests Across Services
Distributed tracing tracks a single request as it moves through your system. Each request is tagged with a unique Trace ID, and its journey is broken into spans - complete with metadata like duration, error codes, and timestamps. This allows you to filter requests by attributes such as user_id or http.status_code to quickly identify issues[7].
Instead of manually piecing together logs - a process that can take anywhere from 30 to 90 minutes - distributed tracing automatically maps the request’s path[1]. You can instantly spot where a request slowed down or failed, with visualizations like waterfall charts or flame graphs. Service maps provide a clear view of microservice dependencies and highlight bottlenecks at a glance[6].
When debugging, comparing traces is incredibly helpful. By looking at failed and successful traces side by side, you can quickly identify differences - whether it’s an API version, an environment variable, or a specific code path[6].
"Distributed tracing provides the investigation path... You found the root cause without reading a single log line." - Alexandr Bandurchin, Uptrace[6]
To optimize performance, focus on the critical path - the sequence of spans that directly impacts the total request duration. Improving operations outside this path won’t enhance user experience. For asynchronous processes like Kafka or RabbitMQ, ensure trace context is maintained across message boundaries. TraceKit integrates seamlessly with standard protocols to provide end-to-end visibility across your system[6][5].
Why TraceKit Solves These Problems
What TraceKit Offers
TraceKit takes debugging to the next level by addressing the shortcomings of reactive logging. It provides small teams with powerful debugging tools that are typically reserved for enterprise-level solutions - without the hefty price tag or complexity. One standout feature is dynamic logs, which allow you to capture the application state directly from the dashboard. No need to redeploy your code or disrupt your workflow.
Another key offering is distributed tracing, which starts working as soon as you install the SDK. Built on OpenTelemetry, it tracks requests across your entire tech stack, whether you're using Node.js, PHP, Python, Go, Java, or Ruby. It even includes auto-instrumentation for frameworks like Express, Laravel, Django, Spring Boot, and Rails, and the setup takes less than 4 minutes[1].
TraceKit also includes AI-powered anomaly detection to identify traffic spikes, unusual patterns, and potential DDoS attacks. If something goes wrong, the request lifecycle replay feature lets you see exactly how and why a request failed, providing a clear path to resolution[1].
To keep your team in the loop, you can send alerts to tools like Slack, Telegram, or custom webhooks. Plus, you can embed status badges directly into your app or status pages for real-time updates.
TraceKit vs. Standard Logging
The main difference between TraceKit and traditional logging lies in their approach: proactive vs. reactive debugging. Standard logging often leaves you playing catch-up, adding console.log statements, redeploying, and hoping you've captured the right data. TraceKit eliminates this guesswork by allowing you to capture the state on demand, without modifying your code.
| Feature | Standard Logging | TraceKit |
|---|---|---|
| Predictability | Reactive; relies on guessing what to log | Proactive; captures state on demand |
| Data Captured | Limited to predefined variables | Full variable state at any line |
| Deployment | Requires redeployment for changes | No redeployment needed |
| Cost | High storage costs for excessive logs | Request-based, predictable pricing |
| Setup Time | Manual and ongoing | Automated, under 4 minutes |
"TraceKit helped me find performance issues before I released the new version of my framework. I was able to fine-tune everything and fix problems before they hit users." - Ali Khorsandfard, creator of the Gemvc PHP Framework[1]
These features not only simplify debugging but also reduce operational costs, making them a great fit for smaller teams.
Pricing That Works for Small Teams
TraceKit’s pricing is designed to grow with your needs, offering flexibility and affordability. The Starter plan is $29/month and includes 1 million traces per month with 7-day retention - sufficient for handling around 100,000 requests per day[1]. This is a fraction of the cost of competitors like Datadog (starting at $500/month) or New Relic (ranging from $50,000 to $250,000 annually).
For teams managing larger traffic, the Growth plan is $99/month, offering 10 million traces per month with 30-day retention - perfect for roughly 1 million daily requests. The Pro plan, at $299/month, supports up to 50 million traces per month and offers 180-day retention, ideal for apps with up to 5 million daily requests. All paid plans include unlimited team members and services, with no extra charges for adding developers or microservices.
There's also a free tier available, offering 200,000 traces per month with 7-day retention - great for students and indie developers[1]. Unlike other platforms that charge based on hosts or errors, TraceKit uses request-based pricing, ensuring your costs scale predictably with your traffic.
"Every minute spent debugging is a minute not spent shipping features. We're here to give you those minutes back." - Terry Osayawe, Founder, TraceKit[5]
TraceKit vs. Competitors
As we've discussed earlier, reactive logging often falls short for small teams. Comparing TraceKit to other leading tools highlights why it's a better fit for teams looking for simplicity, affordability, and powerful debugging features.
TraceKit vs. Datadog
Datadog is built with large enterprises in mind, while TraceKit focuses on the needs of small teams. Datadog caters to organizations with dedicated DevOps teams, offering a suite of tools that often exceed what smaller teams require. In contrast, TraceKit delivers powerful debugging tools that are easy to use and tailored for startups and small teams.
Datadog's pricing can be a hurdle for growing teams. Its model includes $31 per host per month for APM, plus additional fees like $0.10/GB for log ingestion and $0.05 per hour per custom metric [8]. These costs can add up quickly. Take the example of a 5-person SaaS startup: they were paying $4,800 per month for Datadog - $2,400 for 15 APM hosts, $1,200 for log management, and $750 for custom metrics. After switching to TraceKit's Growth plan, their monthly cost dropped to $950, saving them 80% or about $46,200 annually - enough to hire another engineer [8].
The complexity of setup is another key difference. TraceKit can be installed with a single command in under 4 minutes [1]. On the other hand, Datadog requires a more involved process, including installing agents, configuring sidecars, and learning its query language. This can take hours or even days [8].
| Criteria | TraceKit | Datadog |
|---|---|---|
| Pricing Model | Request-based (predictable) | Host-based (scales with infra) |
| Starting Cost | $29/month | ~$500+/month |
| Setup Time | < 4 minutes | Hours to days |
| Dynamic Logs | ✅ Included | ❌ Limited/Complex |
| Best For | Small teams & startups | Large enterprises with Ops teams |
"Datadog's UI is cluttered with features we never used. TraceKit's interface is focused on debugging – click a trace, see the issue, fix it." - Terry Osayawe, Founder of TraceKit [8]
While Datadog excels for large companies with complex needs, TraceKit's simplicity and affordability make it a standout choice for smaller teams.
TraceKit vs. Sentry
TraceKit takes a proactive approach to debugging, setting it apart from reactive error trackers like Sentry.
Sentry works by capturing errors after they occur, which is useful but limited. TraceKit, on the other hand, enables real-time inspection of your code at any point - even before an error happens. This is especially valuable for identifying performance issues and elusive bugs that don't crash your application.
| Criteria | TraceKit | Sentry |
|---|---|---|
| Primary Focus | Full observability & dynamic logs | Reactive error tracking |
| Dynamic Logs | ✅ Included | ❌ Not offered |
| Variable Inspection | Real-time at any capture point | Limited to error context |
| Starting Price | $29/month | Higher event-based pricing |
"Sentry shows you errors after they happen. TraceKit lets you capture variable state at any point in your code - including the moments before an error, or for bugs that don't throw exceptions at all." - TraceKit [1]
TraceKit also offers features like distributed tracing and AI-powered anomaly detection as standard, while Sentry primarily focuses on error tracking with performance monitoring available as an add-on. For teams seeking a single tool to handle application observability with straightforward, request-based pricing, TraceKit is the better choice.
Conclusion
Traditional logging methods often lead to inefficiencies, especially in environments where AI coding assistants are heavily used - something that now applies to 78% of developers [2]. The constant need to add logs, redeploy, and wait for results wastes valuable time and slows down debugging.
TraceKit offers a smarter approach. With dynamic logs, you can capture the exact state of variables, request payloads, and headers at the moment a failure occurs - directly in production and without redeploying. This eliminates the repetitive logging cycle entirely. Plus, its distributed tracing feature gives you a clear sequence diagram of the request lifecycle across services, cutting root-cause analysis from hours to just minutes [1].
For smaller teams, TraceKit is budget-friendly, starting at just $29/month and setting up in under four minutes. It’s also accessible to indie developers and students, thanks to its Free tier, which includes 200,000 traces per month along with dynamic logs. Compare that to enterprise tools like Datadog, which start at $500 or more per month, and TraceKit becomes an obvious choice [1].
FAQs
Are dynamic logs safe in production?
Yes, using dynamic logs in production can be safe if you implement the right precautions. By ensuring secure sessions and limiting access to authorized personnel, you can minimize risks. Tools like TraceKit allow for real-time debugging without causing disruptions, helping you troubleshoot issues while keeping your system stable.
How do traces work across microservices?
Traces in microservices provide a way to monitor requests as they move through different services, offering a comprehensive view of each transaction. By assigning unique trace IDs to these requests, developers can track their exact journey, spot slowdowns, and locate errors. Unlike standalone logs, distributed tracing shows how requests interact across multiple systems, making it easier to understand system behavior and resolve issues quickly in intricate architectures.
What’s the setup effort to start debugging live?
Setting up dynamic logs with TraceKit is straightforward and takes just a few minutes. Here’s how it works:
- Sign In: Start by logging into your TraceKit account.
- Install with One Command: Use a single command to instrument your application.
- Enable Dynamic Logs: Activate dynamic logs to begin debugging instantly.
Once everything is in place, you'll be able to debug your app in real time - no need to redeploy or halt your application. This quick and easy setup makes TraceKit a practical tool for teams that need fast, actionable debugging solutions.
Related Blog Posts
Related Posts

Production Debugging: When to Use Logs vs. Live Breakpoints
When to use logs vs live breakpoints in production. Logs track event history; live breakpoints inspect variables in real time without redeploying.

Laravel Production Debugging: Beyond Logs and Error Tracking
Debug Laravel in production beyond dd() and Log::info(). Use Telescope, dynamic logs, distributed tracing, and performance profiling.

Debug Production Without Redeploying: Step-by-Step Guide
Step-by-step guide to debugging production without redeploying. Set up dynamic logs for PHP, Node.js, Go, and Python in minutes.