
When building Laravel applications, tracking errors and performance issues can be challenging. OpenTelemetry makes it easier by providing detailed request tracing, helping you identify bottlenecks like slow database queries or redundant API calls. This guide walks you through setting up OpenTelemetry in Laravel using TraceKit as your backend, covering:
- Prerequisites: Requires PHP 8.0+ and Laravel 10.x–12.x.
- Installation: Composer packages for OpenTelemetry and TraceKit setup.
- Configuration: Setting environment variables and enabling auto-instrumentation.
- Custom Spans: Adding manual spans for deeper insights into business logic.
- Testing: Verifying trace exports using TraceKit’s Local UI.
TraceKit offers a free tier and lightweight tracing, making it a cost-effective choice for Laravel developers. Start optimizing your application’s performance with this step-by-step guide.
PHP – Monitoring a PHP application with OpenTelemetry and SigNoz
sbb-itb-0fa91e4
Prerequisites and Environment Setup
Before you dive into tracing Laravel requests, make sure your environment is properly configured. Most of the necessary tools should already be in place.
System Requirements and Dependencies
To use OpenTelemetry auto-instrumentation, you’ll need PHP 8.0 or higher. For production environments, PHP 8.1 or newer is recommended. TraceKit supports automatic instrumentation for Laravel versions 10.x, 11.x, and 12.x [3].
You’ll also need Composer for managing dependencies and PECL for installing the OpenTelemetry PHP extension. If you’re on Linux, ensure that packages like gcc, make, and autoconf are installed to build the extension from source [7].
To check if the OpenTelemetry extension is active, run:
php --ri opentelemetry If the extension isn’t active, add this line to your php.ini file:
extension=opentelemetry.so "PHP needs the OpenTelemetry extension loaded globally so that all processes can access it, including those spawned by web servers or commands like
php artisan serve." – SigNoz Documentation [7]
Once your environment is set up, you’re ready to configure TraceKit as your OTLP exporter.
Installing TraceKit as the OTLP Exporter
With your environment configured, TraceKit acts as your observability backend. It offers a Starter plan priced at $29/month, which includes 1 million traces per month, 7-day retention, and unlimited team members [3].
For local development, TraceKit provides a Local UI that runs entirely on your machine. To install it globally, use:
npm install -g @tracekit/local-ui Start the Local UI with:
tracekit-local This launches a dashboard at http://localhost:9999, where you can view traces without sending data to the cloud. The Local UI automatically manages old data, retaining a maximum of 1,000 traces or up to 1 hour of data [3].
TraceKit is lightweight, adding less than 5% overhead, making it a solid choice for both development and production environments.
Installing and Configuring OpenTelemetry PHP
To get OpenTelemetry up and running with Laravel, you’ll need to follow these three steps: install the necessary packages, set up a service provider, and configure environment variables.
Installing Required Packages
Start by installing the OpenTelemetry packages. Run the following Composer commands in your project’s root directory:
composer require open-telemetry/sdk composer require open-telemetry/exporter-otlp composer require open-telemetry/opentelemetry-auto-laravel composer require php-http/guzzle7-adapter Here’s what each package does:
open-telemetry/sdk: Provides the core functionality of OpenTelemetry.exporter-otlp: Handles exporting traces to TraceKit.opentelemetry-auto-laravel: Automatically captures Laravel lifecycle events like HTTP requests, database queries, and queue jobs.php-http/guzzle7-adapter: Acts as the HTTP transport layer.
If your application uses PDO for database connections, you’ll need one more package:
composer require open-telemetry/opentelemetry-auto-pdo Once the packages are installed, move on to setting up the tracer by configuring a service provider.
Configuring the Service Provider
Use the following command to generate a service provider:
php artisan make:provider OpenTelemetryServiceProvider Now, open the newly created app/Providers/OpenTelemetryServiceProvider.php file and add this code to the boot() method:
use OpenTelemetry\SDK\Trace\TracerProvider; use OpenTelemetry\SDK\Trace\SpanProcessor\BatchSpanProcessor; use OpenTelemetry\Contrib\Otlp\SpanExporter; use OpenTelemetry\SDK\Common\Attribute\Attributes; use OpenTelemetry\SDK\Resource\ResourceInfo; use OpenTelemetry\API\Globals; public function boot() { $resource = ResourceInfo::create(Attributes::create([ 'service.name' => config('app.name'), 'deployment.environment' => config('app.env'), ])); $exporter = new SpanExporter( (new \OpenTelemetry\Contrib\Otlp\OtlpHttpTransportFactory())->create( env('OTEL_EXPORTER_OTLP_ENDPOINT') . '/v1/traces', 'application/x-protobuf' ) ); $tracerProvider = TracerProvider::builder() ->addSpanProcessor(new BatchSpanProcessor($exporter)) ->setResource($resource) ->build(); Globals::registerInitializer(fn () => $tracerProvider); } Finally, register the service provider in config/app.php by adding it to the providers array.
Setting Environment Variables
The last step is configuring the environment variables. Add the following settings to your .env file:
OTEL_PHP_AUTOLOAD_ENABLED=true OTEL_SERVICE_NAME=your-laravel-app OTEL_TRACES_EXPORTER=otlp OTEL_EXPORTER_OTLP_PROTOCOL=http/protobuf OTEL_EXPORTER_OTLP_ENDPOINT=http://localhost:4318 OTEL_PROPAGATORS=baggage,tracecontext If you’re using TraceKit’s cloud service, replace the endpoint with https://api.tracekit.dev:4318. For local setups, keep it as http://localhost:4318.
The OTEL_PHP_AUTOLOAD_ENABLED variable is critical – it ensures the SDK initializes automatically. For production environments with heavy traffic, you can enable sampling to limit the load:
OTEL_TRACES_SAMPLER=parentbased_traceidratio OTEL_TRACES_SAMPLER_ARG=0.1 This configuration captures 10% of traces. If you only need tracing and want to disable metrics and logs, include the following:
OTEL_METRICS_EXPORTER=none OTEL_LOGS_EXPORTER=none "PHP needs the OpenTelemetry extension loaded globally so that all processes can access it, including those spawned by web servers or commands like php artisan serve." – SigNoz
Enabling Auto-Instrumentation for Laravel
Once you’ve set up OpenTelemetry, the next step is enabling auto-instrumentation to effortlessly track Laravel’s lifecycle events. This feature integrates with HTTP requests, database queries, routes, queue jobs, and cache operations – no manual code adjustments required.
Integrating Auto-Instrumentation
The open-telemetry/opentelemetry-auto-laravel package simplifies auto-instrumentation by embedding itself into Laravel’s lifecycle through Composer. With over 1.8 million installations on Packagist as of early 2026, it’s widely adopted by Laravel developers [8].
To activate it, set the following in your .env file:
OTEL_PHP_AUTOLOAD_ENABLED=true This assumes you’ve already confirmed the OpenTelemetry PHP extension as part of the prerequisites.
"Auto-instrumentation solves this by hooking into Laravel’s lifecycle events and framework components. The moment a request arrives, spans are created automatically." – Nawaz Dhandala, OneUptime [4]
Next, publish the configuration file by running:
php artisan vendor:publish --tag=opentelemetry-config This creates a file at config/opentelemetry.php, where you can fine-tune settings. For example, you can enable or disable specific watchers or define rules to redact sensitive headers and query patterns.
Once auto-instrumentation is running, take it a step further by configuring service attributes to better organize trace data.
Configuring Service Attributes
Service attributes allow you to categorize and filter trace data within your observability dashboard. While you’ve likely already set OTEL_SERVICE_NAME in your .env file, adding version and environment details can enhance trace clarity:
OTEL_SERVICE_VERSION=1.2.0 OTEL_RESOURCE_ATTRIBUTES=deployment.environment=production The deployment.environment attribute corresponds to Laravel’s APP_ENV, making it easy to differentiate between production, staging, and development traces. Meanwhile, the service.version attribute links traces to specific application releases, which is invaluable for diagnosing performance issues tied to particular deployments.
Auto-instrumentation introduces minimal latency – typically less than 5ms per request [4]. If you’re working in a high-traffic production environment, you can enable sampling to balance performance and data collection. For instance, using a 10% sampling rate:
OTEL_TRACES_SAMPLER_ARG=0.1 This reduces the system load while still providing enough data for effective debugging and analysis.
Adding Manual Spans and Custom Instrumentation
Auto-instrumentation is great for tracking framework-level events like HTTP requests or database queries. But when it comes to understanding what’s happening inside your business logic – like tracking multi-step processes such as order creation, inventory checks, or payment processing – you’ll need to roll up your sleeves and add manual spans.
Manual spans let you map your custom business operations to TraceKit’s detailed observability tools, giving you a clearer view of what’s happening under the hood.
Creating Manual Spans in Controllers
To get started with manual spans, you’ll first need a tracer instance. You can grab one using Globals::tracerProvider()->getTracer('instrumentation-name') [9][2]. The typical process involves a few key steps: building the span, starting it, activating its scope, running your logic, and then ending the span while detaching the scope.
Here’s an example using a Laravel OrderController to create a create-order span. This span captures attributes like user.id and order.items.count [2].
use OpenTelemetry\API\Globals; use OpenTelemetry\API\Trace\StatusCode; public function createOrder(Request $request) { $tracer = Globals::tracerProvider()->getTracer('order-service'); $span = $tracer->spanBuilder('create-order')->startSpan(); $scope = $span->activate(); try { $span->setAttribute('user.id', auth()->id()); $span->setAttribute('order.items.count', count($request->items)); // Your business logic here $order = Order::create($request->validated()); $span->setStatus(StatusCode::STATUS_OK); return response()->json($order); } catch (\Exception $e) { $span->recordException($e); $span->setStatus(StatusCode::STATUS_ERROR); throw $e; } finally { $span->end(); $scope->detach(); } } It’s important to include $scope->detach() in the finally block to ensure proper span hierarchies are maintained [9][5].
To make your code cleaner and avoid repeated calls to Globals, consider injecting TracerInterface directly into your controller’s constructor [5]:
use OpenTelemetry\API\Trace\TracerInterface; class OrderController extends Controller { public function __construct(private TracerInterface $tracer) { } public function createOrder(Request $request) { $span = $this->tracer->spanBuilder('create-order')->startSpan(); // ... rest of the code } } With this setup, you’re ready to dive deeper into tracking complex workflows using nested spans.
Instrumenting Business Logic and API Calls
When dealing with multi-step workflows, nested spans are your best friend. For example, an OrderService might create separate spans for operations like order.check_inventory, order.calculate_total, and order.process_payment. This approach makes it easier to pinpoint delays, such as an external payment gateway slowing things down [5].
For better compatibility, use OpenTelemetry conventions for span attributes, such as http.method, db.system, or user.id [9]. When dealing with external API calls, capture details like http.status_code and http.url to trace issues back to your business logic [6].
If you only need to add metadata to an existing span – like tagging a user ID – you can use Span::getCurrent() instead of creating a new span [9][5]:
use OpenTelemetry\API\Trace\Span; $currentSpan = Span::getCurrent(); $currentSpan->setAttribute('user.email', auth()->user()->email); $currentSpan->setAttribute('tenant.id', $request->tenant_id); Here’s a quick reference for the most common methods:
| Method | Purpose | Usage Context |
|---|---|---|
spanBuilder('name') |
Initializes span creation | Start of a business operation |
startSpan() |
Starts the span timer | Before logic runs |
activate() |
Makes the span current | Required for automatic nesting |
setAttribute() |
Adds metadata | Adding IDs, user info, etc. |
recordException() |
Captures error details | Inside catch block |
detach() |
Removes span from context | Inside finally block |
end() |
Stops the span timer | Inside finally block |
With these tools, you can track every step of your business logic, ensuring nothing slips through the cracks.
Exporting Traces and Metrics to TraceKit
After setting up OpenTelemetry and adding custom spans, the next step is verifying that your traces are successfully exported to TraceKit. With the groundwork laid, TraceKit provides a visual representation of your traces and metrics.
Testing Trace Export with TraceKit
First, make sure the TraceKit Local UI is installed and running (refer to earlier instructions if needed). Launch the dashboard by executing:
tracekit-local This starts the dashboard at http://localhost:9999, which automatically captures traces when your APP_ENV is set to "local" [3].
To generate test traces, trigger specific routes in your Laravel application. Once done, refresh the dashboard. Your service should appear, displaying individual traces that detail the full request lifecycle. Keep in mind, the Local UI retains up to 1,000 traces or stores data for up to an hour [3].
If no traces are visible, double-check that the OpenTelemetry extension is activated (as outlined earlier). For debugging, temporarily set OTEL_TRACES_EXPORTER=console in your environment variables. This will output span data directly to your terminal, helping you identify any issues [7][2].
For production environments, ensure variables like TRACEKIT_API_KEY and OTEL_EXPORTER_OTLP_ENDPOINT are correctly configured. Use php artisan tinker to confirm that environment variables such as OTEL_SERVICE_NAME are loading as expected. If you’re using Laravel Octane with Swoole and traces are missing, try switching OTEL_EXPORTER_OTLP_PROTOCOL to http/protobuf. This tweak often resolves gRPC-related issues caused by Swoole thread pool behavior [10].
Once traces appear in TraceKit, you’re ready to dive into the detailed analysis covered in the next section.
Analyzing Trace Data
After confirming trace exports, you can begin analyzing your data. TraceKit offers tools like flame graphs, service maps, and request waterfalls to help you pinpoint where time is being spent. For instance, spotting numerous small, identical database spans stacked together often signals an N+1 query issue, which can typically be addressed by implementing eager loading [1][6].
TraceKit is optimized to minimize performance impact, averaging less than a 5% increase in request times. Additionally, enabling GZIP compression for OTLP exports can reduce network bandwidth usage by as much as 70–80% [3][6]. Metrics are buffered and exported every 10 seconds or when the buffer reaches 100 metrics, so slight delays in updates are normal [3].
To protect sensitive data, you can disable SQL query parameter logging by setting TRACEKIT_INCLUDE_BINDINGS=false in your .env file [3]. For easier production debugging, consider creating a /health/telemetry route that checks extension_loaded('opentelemetry') and displays your current environment settings. This approach simplifies diagnosing configuration issues without requiring SSH access [6].
TraceKit vs Datadog: Cost Comparison for Small Teams
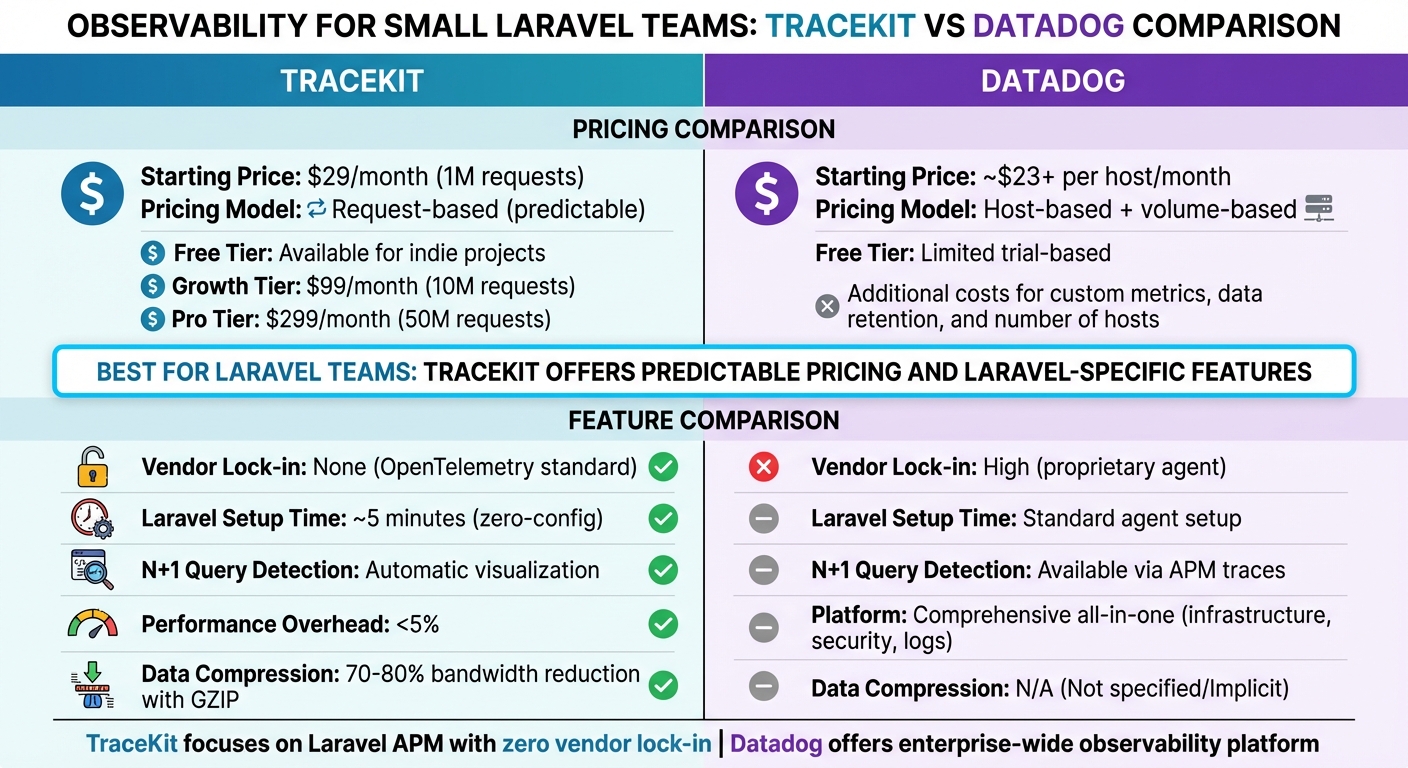
TraceKit vs Datadog Pricing and Features Comparison for Laravel Teams
Once your tracing setup is in place, it’s time to weigh your options for an observability platform. For small teams, the choice often comes down to TraceKit’s predictable request-based pricing versus Datadog’s enterprise-level features.
Feature and Pricing Comparison
TraceKit offers a simple pricing structure based on the number of requests. For $29/month, the Starter tier covers up to 1 million requests (approximately 100,000 per day) [11].
Datadog, on the other hand, employs a host- and volume-based pricing model, which can lead to higher costs as your usage grows. Their pricing starts at roughly $23 per host per month for APM features, with additional charges for custom metrics, data retention, and the number of hosts [2].
| Feature | TraceKit | Datadog |
|---|---|---|
| Starting Price | $29/month (1M requests) [11] | ~$23+ per host/month |
| Pricing Model | Request-based (predictable) [11] | Host-based + volume-based |
| Free Tier | Available for indie projects [11] | Limited trial-based |
| Vendor Lock-in | None (OpenTelemetry standard) [2] | High (proprietary agent) [2] |
| Laravel Setup Time | ~5 minutes (zero-config) [1] | Standard agent setup |
| N+1 Query Detection | Automatic visualization [1] | Available via APM traces |
For teams with higher traffic, TraceKit’s Growth tier ($99/month) supports up to 10 million requests, while the Pro tier ($299/month) accommodates 50 million requests [11].
The decision boils down to priorities. Datadog offers a comprehensive, all-in-one platform with extensive integrations across infrastructure, security, and logs. Meanwhile, TraceKit zeroes in on application performance monitoring, particularly for Laravel-based stacks. Features like automatic N+1 query detection and adherence to OpenTelemetry standards make TraceKit a cost-effective, Laravel-friendly choice without the constraints of vendor lock-in [2].
Up next, dive into advanced troubleshooting techniques using TraceKit’s user-friendly tools.
Conclusion
Getting OpenTelemetry up and running in Laravel with TraceKit is straightforward – just install the package, add your API key, and you’re good to go. Tracing kicks in automatically, saving you time and effort.
But TraceKit goes beyond just making setup easy. It offers something Laravel’s standard logs can’t: automatic issue detection. While logs might tell you something went wrong, TraceKit shows you why with flame graphs that map out the entire request flow. You can spot problems like N+1 queries or slow middleware in seconds.
For local development, the TraceKit Local UI (available at http://localhost:9999) lets you debug in real-time without sending data anywhere else. And when you’re ready to move to production, the free tier has you covered – no credit card needed.
This tool doesn’t just make troubleshooting faster; it helps developers fine-tune their applications using clear, actionable insights.
"Modern Laravel applications need modern observability. Stop guessing and start knowing." – Terry Osayawe, Founder of TraceKit
FAQs
Why am I not seeing any traces in TraceKit Local UI?
If traces aren’t showing up in TraceKit’s Local UI, start by reviewing your OpenTelemetry setup. Double-check the exporter URL, sampler settings, and environment variables like OTEL_SERVICE_NAME to ensure they’re correctly configured. Make sure your Laravel application is properly instrumented and sending traces to the intended endpoint. Additionally, verify that your tracing exporter is active and reachable, and confirm that any self-hosted tools, such as Zipkin, are up and running without issues.
Do I really need the OpenTelemetry PHP extension installed globally?
Installing the OpenTelemetry PHP extension globally is highly recommended for achieving full auto-instrumentation and smooth integration, particularly in production environments. Although some tools or packages might provide ways to work without a global installation, setting it up globally ensures thorough tracing and aligns with the standard practices for most configurations. That said, newer methods might present alternative options based on your specific needs.
How do I trace a custom workflow with manual spans in Laravel?
To track a custom workflow in Laravel using OpenTelemetry, you’ll need to manually create and manage spans around your code. Here’s how you can do it:
- Get a tracer: Use the OpenTelemetry SDK to obtain a tracer.
- Start a span: Begin a span before your workflow execution.
- Run your code: Place your workflow logic within the span’s context.
- End the span: Close the span after the workflow completes.
Here’s an example of how it looks in code:
$tracer = TracerProvider::getDefaultTracer(); $span = $tracer->startSpan('custom_workflow'); // Your code here $span->end(); This approach gives you control over how and where spans are created, offering a clear view of your workflow’s performance and behavior.